Counters and Clocks
Making a Nixie Clock is one application of the information on this page
Electronic clocks are analogous to mechanical clocks. The escapement is represented by the oscillator, analogous to the mechanical oscillators of a mechanical clock. The chain of gears moving the indicating hands is represented by a counter, which counts the oscillations of the oscillator. In this page, I discuss the various counter IC's and how to use them. Then, the construction of a digital clock with a Nixie display is described.
Counter Principles
Since it is very helpful to know how they work when using them, the fundamentals of electronic counters will be presented here, and the reader is encouraged to perform the experiments, which are simple but instructive. A counter is a sequential logic machine, since the outputs depend on past inputs, not simply on the current values of the inputs. The basic component of sequential logic is the flip-flop or bistable circuit that serves as memory, since it persists in the last state to which it was set.
All you will need for the experiments is a 74LS74A and two 74LS00's (or their HC equivalents), breadboard, jumper wire, 5V power supply, several LED's and 330Ω resistors for them, and an SPDT pushbutton. You'll build and test ripple binary, synchronous binary, and Johnson ring counters.
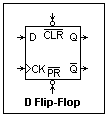 A useful and frequently-used flip-flop is the 74LS74A dual D flip-flop. The 74HC74A works the same way, but with CMOS levels. The 4000 CMOS equivalent is the 4013. One of its units is represented in the diagram at the right. D is the data input. A high or low state of this pin is transferred to the output Q, and its complement to /Q (we represent Q bar with a slash in front), when the clock input CK makes a low-to-high transition, a "positive edge." The action takes place only in a small time window around the clock transition, so the device is said to be "edge triggered." The state of the D pin can vary at will, but only the value existing when the clock edge occurs will be noticed. Level-triggered devices are more reliable, but are hard for logic designers to understand and use properly, so edge-triggering now dominates. The chip designers have done an excellent job in making the 74A a reliable device, and it is easy to use.
Each unit of the 74A has preset (PR) and clear (CLR) inputs that force the output Q to 1 (PR) or to 0 (CLR) at once when they are activated. Controls that operate this way are called asynchronous. If they wait for the active clock edge, they are called synchronous. These distinctions are often used with counters, and are quite important in making a design. For our experiments, just leaving them unconnected is equivalent to tying them high. In actual circuits, however, it is always best to connect them with +5 through a resistor (4.7k is typical), or even directly to +5, for reliability.
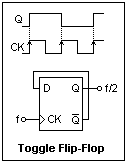 If you connect the output /Q with the data input, the data will always be opposite to the current state of the flip-flop. Therefore, at an active clock edge, the flip-flop will change state, or "toggle." The designers have made certain that when the changed data appears, the input is no longer sensitive. However, you must guarantee that the clock edge is sufficiently sharp, or there will be trouble. Bad clock edges are the main source of difficulty with counters. In case of doubt, use a 74LS14 Schmitt-trigger inverter to clean up the clock signal. The toggle flip-flop, by itself, is a 1-bit counter with the states 0, 1. It divides the input frequency by 2, which it is frequently called upon to do. When the clock duty cycle is not 50%, a toggle flip-flop will correct this and give an exact 50% duty cycle, as suitable for LCD's.
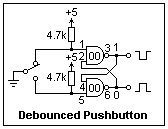 To test a toggle flip-flop or other counter circuits, a debounced pushbutton is essential. The circuit is shown at the right. Pin numbers for the 74 and the 00 are shown in the figure below. A 74HC00 will drive both LSTTL and CMOS. The SPDT pushbutton is the hardest thing to find. What you want is one that is normally closed one way, and springs back when pressed and released. One output gives a negative pulse (usually used for counter clocks) and the other gives a positive pulse. If you use a simple logic switch with an SPST switch and a resistor, or a grounded wire, you will find that the state of a toggle after triggering will be random enough to be a good game of chance! The debounced pushbutton is useful enough to make a permanent circuit in a small box, perhaps together with an LED logic probe or two.
Let the number of flip-flops in a counter be N. We have just studied the easy case N = 1. For N = 2 there are 22 = 4 different possible states, that we can represent as 00, 01, 10 and 11. Each digit corresponds to the state of one of the flip-flops. If we interpret them as a binary number, the first digit is the most significant bit (msb), and the second one the least significant bit (lsb). The assignment is arbitrary, but if we count in this order, the lsb varies more rapidly than the msb. In data sheets, bit inputs are represented by letters A, B, C ..., where A is the lsb, and succeeding letters are the higher-order bits, up to the msb. As binary numbers, the bits have the weights 1, 2, 4, 8 and so on, with 1 = lsb. It is important to get the bits in the correct order when constructing a circuit.
In general, for N flip-flops there are 2N different states, each of which is present in the complete binary counting sequence beginning with all zeros, and up to all ones.
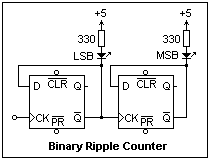 A binary counter counts in the binary sequence, which for N = 2 is 00, 01, 10, 11. Two toggle flip-flops can be connected so they will count this way, as shown at the left. LED's are provided to show the states. Pulses to be counted are applied to the clock input of the first flip-flop, which toggles on every pulse. Every other time, the /Q output goes high, clocking the second flip-flop. This can be continued for any number of flip-flops, each one of which will represent a binary digit. If the delay from the clock edge of a flip-flop to the change in the output is td, then the Nth flip-flop changes a time (N - 1)td after the first. The changes ripple down the line of flip-flops, and this type of counter is called a binary ripple counter. For the LS74, the delay time is somewhere around 25 ns, so a 16-bit counter will require about 400 ns to settle down. In some applications, this delay is of no consequence.
More troublesome is the occurrence of glitches with ripple counters. This refers to the intermediate states while the action is rippling down the line, which may trigger unwanted events. For example, if an 8-bit ripple counter is at 01111111, the next clock produces 01111110, 01111100, 01111000 and so on before finally reaching 10000000, the next static state. For this reason, it is not usual to look at the intermediate bits of a ripple counter, and they are not satisfactory for clocks. Ripple counters were found only in the 4000 series CMOS logic, and in the HC equivalents. N = 4, 7, 10, 12 and 14 are available.
To eliminate glitches as far as possible, all the flip-flops should change state at the same time. This is done by connecting all the clock inputs to one clock signal. Counters that work this way are called synchronous, since everything happens at the effective clock edge. In this case, logic must be used that produces the proper next state for each flip-flop, depending on the current state. This is a standard exercise in digital design, to texts of which the reader is referred for general methods.
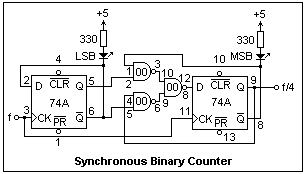 The case of N = 2 is simple enough to solve by inspection, and the result is given at the right. D1 = Q0 XOR Q1 is the data for the second flip-flop, which can be realized with NAND gates as shown. Check this state by state to verify that it is correct. Synchronous binary counters require a lot of logic, and they are not made from discrete components, except as a school exercise. However, this one is easy to breadboard and test, and brings out the essentials.
If a counter with N = 4 is used only to count from 0000 = 0 to 1001 = 9, it is called a decimal or BCD (binary-coded decimal) counter. It is arranged so that the next clock when at 9 brings the counter back to 0000. There is nothing strange at all in this. Any synchronous counter can be made to count in any sequence whatsoever through any of the possible states. A decimal counter is simply one example. Indeed, many counters can be made to reset themselves when reaching a certain count, or even to load a certain starting number at that point. Synchronous counters can even be made to count backwards or forwards as desired. They are very flexible sequence engines indeed.
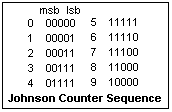 Another kind of synchronous counter eliminates glitches entirely. This is the Johnson counter that is based on a shift register of N stages. A shift register is a series of flip-flops with each output Q connected to the next input D, and the clock inputs connected together. Any data presented to the first D input is shifted down the line of flip-flops one stage for each clock, and eventually appears at the output of the final flip-flop. In a Johnson counter, the final output is complemented (inverted) and applied to the first D input, making a closed ring. To some it suggests a Möbius strip, so it is also called a Möbius counter. For N = 5, the counting sequence is shown at the left. There are 10 states, so this is a decimal counter by nature, and the states can be assigned to the integers 0-9 as shown. Note that this is not the binary sequence!
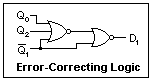 The N = 5 Johnson counter uses 10 states, but 25 = 32 are available, so 22 states are unused. Should any of these appear by chance, then the counting sequence is destroyed, and the counter collapses. Therefore, it is necessary that a Johnson counter have a self-correction circuit that removes any erroneous states. The logic shown at the right, when used to feed the third flip-flop in a Johnson counter, eliminates bad states in a few clocks. For example, 00010 is eliminated at the next clock, 00101 requires two clocks, while 00100 needs four. I do not know the source of this circuit, used in the 4000 series logic, but it is very ingenious. Textbooks seem to give useless methods of self-correction.
 For the case N = 2, the Johnson counter has 4 states, just as the binary counter does, so there are no erroneous states and no need for self-correction. The circuit is shown at the left. Note that Q is connected directly to D, so it is a shift register, and the feedback is correct. The new thing added here are the decoding circuits, which detect each of the four states 00 = 0, 01 = 1, 11 = 2, 10 = 3. Here, the digit on the right corresponds to the flip-flop on the left in the diagram. The states merely have to occur in order, so there is no significance in starting with 00. We could have started with any other state, and proceeded in order. Note that the decoding is accomplished by detecting the "edge" between 1 and 0 or 0 and 1 with an AND gate, or with a NAND if an active low output is required.
Johnson counters are very satisfactory, but are given little mention in texts, and appeared only in the 4000-series logic family as the decimal 4017 and the octal 4022, and were ignored in TTL. They have been picked up in HC logic, and a variant HC7022 has even been added. They are ideal for clocks, since the states are completely decoded and can be easily displayed.
The usual way to implement decoded outputs is to use binary counters, and then decoder IC's. The LS (or HC) 138 is a 3-to-8 decoder very useful in computers, the 139 is a dual 2-to-4 decoder (that could be used with the binary counters above), the 41 a BCD-to-10 decoder that gives high outputs for the unused codes A-F, and the 154 a hex-to-16 decoder in a 24-pin DIP. All of these have active-low outputs, which is standard. A glance at the logic diagrams for these chips show that the decoding is not as simple as for a Johnson counter. Incidentally, decoders are static logic, not sequential machines, and can be implemented with NAND gates and inverters. Again, this is a standard problem in digital design, but it is seldom worthwhile to make one's own.
The three principal types of counters have been studied above, so that you know their fundamentals, their advantages and their drawbacks. We can extend the study to the available MSI counter chips, and give some examples of their applications in practice, and of some of their peculiarities. These experiments will follow here in due course.
Practical Counters
Although there seem to be many counters available, there are really only a few principal types, and if these are understood, any counter is easy to use. First, there are the TTL counters of the 90's family, the 74LS90, 74LS92 and 74LS93 (and, of course their HC cousins). These are 4-bit ripple counters, and excellent for simple uses. Secondly, there are the TTL counters of the 160's family, the 74LS160-74LS163, which are 4-bit synchronous counters, with various arrangements for clearing, loading and enabling. Thirdly, there are the CMOS Johnson counters 4017 and 4022, which occur both as 4000-series and HC chips. Finally, there are synchronous up-down counters like the 74LS190-74LS193, whose uses are more specialized.
Two essential techniques in adapting a counter to its job are (1) making a modulo N counter, and (2) cascading counters to get a greater range. We will illustrate these things with the 74LS90 ripple counter. You will need two such chips, and a 74LS08 AND gate, for the experiments that follow. The modulo of a counter is the number of states in its counting sequence. A single toggle flip-flop is modulo-2, while the counters we made above are modulo-4. Don't confuse the modulo N with the number of flip-flops.
The 74LS90 has two sections, one a modulo-2 flip-flop with clock C0 and output Q0, and the other a modulo-5 counter of three flip-flops with clock C1 and outputs Q1, Q2 and Q3. Except for a common clear control, these two sections are independent, and can be used separately. The 74LS93 is the same, except that the high section is modulo-8, with three toggle flip-flops in cascade. If you connect the output Q0 to the input C1, you get a modulo-10 counter in the first case, and a modulo-16 in the second. The clear control consists of two inputs that are AND'ed together. If both are high, then the counter resets to 0 at once (asynchronously). The 74LS90 has, in addition, two set inputs that are AND'ed together. When both are high, the counter is set to the state HLLH or 1001, 9 in BCD. The 74LS93 does not have this, and the pins are no connection. The third member of the family, the 74LS92, has a modulo-6 counter as the second element, but otherwise is the same. With this family, you can get modulo 2, 4, 5, 6, 8, 10, 12 and 16 directly, with no extra logic.
Note that the power is not applied to the corner pins in the LS90 family, but "amidships," with +5 on the left and ground on the right. This was typical of early TTL.
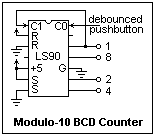 The first thing to do is to get a 74LS90 counting from 0 to 9, and the circuit for this is shown at the right. Activate the clock with the debounced pushbutton that was used above; you will note that this is essential if you try to use a piece of wire instead. The outputs are labeled by their weights 1, 2, 4 and 8, and are active high. Therefore, inverters are necessary to drive LED's if you want ON = 1. Use 74LS04's or 74LS05's, or, better, an octal buffer, to light a line of 8 LED's. Only four are used in here, of course, but you will need them all later. One of the great pleasures of experimenting with counters is watching the lights, so don't deny yourself this. Different colors could be used for the upper and lower nibbles. Check that this counter counts as you expect, returning to 0 after 9. If frequency f is input at C0 (from the TTL output of a function generator, for example), the frequency f/10 will be found at the 8 output. Check what frequencies you obtain at the other outputs.
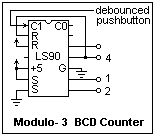 A modulo-3 counter was not in the list of moduli available directly, so let's make one. We will use the modulo-5 section, and arrange that it resets when it reaches 4. This will be the 4 output (Q3), if the input is to C1 (the outputs have been relabelled for the new input). All we have to do is connect this output to the reset input, as shown in the diagram. This counter will now count in the BCD sequence 00, 01, 10, 11. This shows the general principle of designing a modulo-N counter. The counter is reset when it reaches the state N, so the counter counts from 0 to N - 1. I am uncomfortable with this kind of asynchronous "race" reset, but it does work. A similar technique can be used with synchronous counters, but there is no such rowdiness.
If we want a modulus greater than 16, we must cascade more than one counter package. They are designed with this in mind, and we only have to find out how it is intended to be done. The simplest way is ripple cascading, which is appropriate for the 74LS90 family. We found that the 8 output in the modulo-10 counter is at 1/10 the frequency of the input. Its duty cycle is not 50% (this can be arranged if necessary by biquinary counting, discussed below), but this is of no consequence. If we use this output as the clock for a second LS90, we will divide by 10 again, so our counter will be modulus 100, counting in BCD (not binary!). Two LS93's would give us modulus 256, in the same way. The principle of ripple cascading should be clear now.
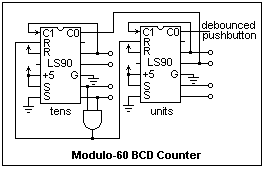 For a clock, we need a modulo-60 counter, which can be made as shown in the diagram by combining our two basic techniques. Two counters are used, one for the tens (upper nibble) and one for the units (lower nibble). The input is applied to the units counter, of course. The key is to detect the 6 in the upper nibble, since the maximum count is to be 59. The next count should return the counter to zero. This is done quite simply by combining the 2 and 4 outputs in an LS08 AND gate, and using the output to clear both counters. Wire up this circuit and test it. Amazingly, it will count from 00 to 59, just what we want for seconds and minutes. If you are building a clock, you will need two of these counters, one to count seconds up to minutes, the other to count minutes up to hours.
We also need a modulo-24 counter to count hours for a 24-hour clock, or a modulo-12 counter for a 12-hour clock. Modulo 12 is available directly with the LS92, and this could also be made to work for 2 x 12 = 24. However, let's proceed directly with a pair of LS90's. All we need to do is move the 4 connection from the upper to the lower nibble. The first time this will give us a clear output will be at 24, and this is just what we want. The count 23 59 will be followed by 24 60, and then both counters will be reset to 00 00. Make this alteration, and see that you now have a modulo-24 counter. By cascading two modulo-60 counters and a modulo-24 counter, you now have an electronic escapement for a clock, which is fed by a 1.000 Hz oscillator signal "tick."
The 7490-7493 family was adopted into the LS clan, but not into HC. In HC, the HC390 and HC393 were the replacements, which were dual 90's and 93's, so that you could count from 0 to 99 with a single HC390, or from 0 to 255 with a single HC393. The HC390 retained the independent divide-by-2 and divide-by-5 sections, but the HC393 is straight binary, and comes in a 14-pin DIP. To cascade the two sections of an HC393, simply connect QD of one sections to the CLK of the other. Since the counter counts on the negative edge of the clock, the second section counts at the correct time. There are LS390's and LS393's as well. There is an HC490 that has set-to-9 inputs in addition to the clear inputs, but no separate divide-by-2 sections. The minutes and hours counters of a clock can be realized with just two HC390's, and decoded with two HC42's each.
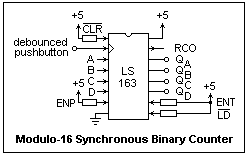 The 74LS160-74LS163 family are 4-bit synchronous counters. The LS160 and LS162 are modulo-10 decade counters, while the others are modulo-16 binary. The pinout and basic circuit for the LS163 is shown at the left. All the resistors are 4.7k. The clock is active on the positive edge, differing from the LS90 family. There are four load inputs, A, B, C and D and a load control /LD. There is a clear, /CLR. Both the load and clear for this counter are synchronous, taking effect only on the next clock edge. You should check this, first loading 1111 by tying /LD low, and then pushing the button. Now let /LD go high again, and tie /CLR low. The counter will not clear until the button is pressed. There are two count enables, ENP and ENT. The counter will not count unless both are high. If you are using only one chip, tie them both high. The outputs QA, QB, QC and QD have weights 1, 2, 4 and 8, in that order, and correspond to the inputs A, B, C and D. Connect these outputs, and the RCO output, to LED's so that you can observe their states.
Clear the counter, and begin to count from 0000. When you reach 1111, note that RCO goes high. When in this state, bring ENT low, and you will see that RCO disappears. ENP does not have this property. That is, ENT enables the RCO output as well as allows the counter to count.
Now take the QD ("8") output and invert it with an LS04 or other inverter, and apply the inverted signal to the /CLR input of the counter. This is exactly what you did with the LS90 counter to make a modulo-N counter. Try this circuit, and you will find that it counts from 0 up to 8, and then returns to zero. It is a modulo-9 counter! You might have expected modulo-8, but here the clear does not occur until the next clock, instead of at once, as with the LS90. To make a modulo-8 counter, you must detect "7" instead, so that the counter will return to 0 on the next clock. The LS160 and LS161 have an asynchronous clear, like the LS90, so if we had been using one of them, we would have had a modulo-8 counter as expected. The load function is synchronous in all four counters.
If we want a larger counter, LS163's can be cascaded synchronously. To do this, the clocks of all the counters are connected together, so that all counters that are enabled count at the same time. It is the enable that is the trick. The ENT of each successive counter is connected to RCO of the preceding counter. Only the first, lowest-order counter has ENT tied high. As this counter counts up from 0 to 14, RCO remains low, and the higher counters are disabled by the low state of their ENT's. When the low-order counter reaches 15, RCO goes high, enabling the next higher-order counter, so that it counts on the next clock, while the low-order counter rolls over to 0. RCO then remains low until the next time 15 is reached, and so on. This can be done for as many counters as desired. The ENP input is connected to all the counters, and is used for disabling the counter as a whole.
Connect two LS163's in this way, with each set up for normal counting. Connect the clocks together and control them with the pushbutton. Connect the ENP's together and tie them high. Connect the RCO of the low-order counter to the ENT of the high-order counter, and tie the ENT of the low-order counter high. Now you have an 8-bit binary counter that will count from 0 to 255.
Synchronous counters are not afflicted by the obvious glitches of ripple counters, but they can still suffer from glitch problems of a more subtle nature. Texas Instruments found that the LS163 had a glitch due to the different propagation times of the ENT and QA signals that can cause trouble at high counting rates. This limits the circuits to 18 MHz (but may have been fixed by now).
The load (preset) facility allows more flexible counting schemes. In addition to the normal modulo-N counting from 0 to N - 1, we can also count from N1 to N2, or from N1 to the maximum count. The RCO output can be inverted to activate /LD, to load some starting number N1 when the counter reaches maximum count. Or, we can detect N2 - 1 on the outputs, and use it to load N1 on the next clock. It is possible to perform some interesting counting tricks with these flexible counters and a little logic.
A very interesting counter is the CD4017BC divide-by-10 Johnson counter. This is a CMOS device, which is also available as the 74HC4017. The maximum supply voltage for the 4017 is 18 V (but only 7 V for the HC4017!). It works well at 5 V, but better at 10, 12 or 15 V. It is not a fast chip, the maximum frequency at 5 V being only 2 MHz, which rises to 6 MHz at 15 V. The HC4017 is a good deal faster, counting at 25 MHz at 5 V. As a CMOS chip, its inputs draw nearly no current. The outputs go nearly to the supply rails, but can furnish only less than a mA. They can drive one LSTTL input. Therefore, the outputs should be buffered if they drive anything other than CMOS. Be sure to use despiking capacitors on the power supply, since switching transients can be considerable. CMOS can be driven by LSTTL if a pull-up resistor, say 4.7k, is used. The low speed of the 4017 is of no consequence in clocks.
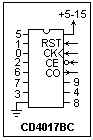 The 4017 is quite different from the other counters we have studied, and close attention should be paid to these differences. Of the 16 pins, 2 are for the power supply, and 10 for the decoded outputs representing 0-9. This leaves only 4 for controls, so the chip is very simple to use. The pinout is shown at the right. The counter counts on the positive edge of the clock signal applied to CK, provided the clock enable, CE, is low. Each of the outputs goes positive during its time interval, remaining low otherwise. When a high level is applied to RST, the counter is reset to 0 immediately, and the 0 output goes high. If both RST and CE are low, the counter will count steadily through its 10 states. The output misnamed Carry Out, CO, is not a carry-out, but has a very definite purpose. It is the output of the fifth flip-flop in the counter, and is low during the 0 - 4 time intervals, and is high during 5 - 9. When the counter counts through its full range, a square wave at f/10 and 50% duty cycle appears at this output, where f is the clock frequency. This output can be used as the clock for another counter that gives an additional divide by 10. This is very convenient, and is often wanted. Nevertheless, it is the only use of CO, which cannot be considered a "terminal count" or TC in any sense, such as a synchronous binary counter produces.
The two basic counter techniques are easily performed with the 4017. It can count modulo-N, were N = 2 to 9, by connecting the output N to the RST input. The chip was specifically designed with this in mind. The same output can be connected to the RST of lower-order counters to reset the whole array. Ripple cascading is also easy. If it is desired to trigger the next higher order at the end of a 10 count, the 0 output is connected to the CK of the higher order counter. This advances the higher order counter exactly when the lower order counter rolls over, since the positive clock edge is the active one. It is also possible to clock the higher counter and reset at any value of N. Although there is not a great deal of flexibility in the counting scheme, the 4017 can perform most of the duties required of a counter, with very little, if any, external logic.
Three exercises with the 4017 are: (1) count down a 1.000 MHz crystal oscillator to 1 Hz, using 6 cascaded counters; (2) make a modulo-60 counter with two 4017's, checking that the cascading is correct; (3) the same, but for a modulo-24 or modulo-12 counter. If you do this, you will be well on the way to understanding how to build a clock. The 4017 is absurdly cheap (much less than a dollar) when you think about what a vacuum-tube decimal counter would cost. This is an absolute marvel, and wonderful to contemplate.
Clocks
The most important question when designing a clock is the means of display. We certainly do not want the binary digits flickering (except in a science-fiction movie), but desire some more direct indication of the time in figures. The basic choice is between analog and numerical. The analog display of time with hands and a circular dial is traditional and familiar. It expresses the cyclical nature of time, and one can get a direct impression of time intervals at a glance. Since 5 x 12 = 60, a dial with 12 major divisions with five minor divisions between each of them (including end points) is a good choice, used on most watches and clocks. This dial can be used equally well for hours, minutes and seconds. A 24-hour dial is possible, but not quite as convenient--above all, one is not used to it. To drive such a display, a stepping motor could be used.
The alternative, a numerical or digital display, makes a clock fully electronic, and is easy to realize. An obvious way is to use an LS47 BCD-to-7 segment decoder, as mentioned in the page on numerical indicator devices, or the LCD equivalent, also explained there, with a 7-segment display. For Nixie tubes, or similar digital displays, we need full decoding of the counter states, as provided directly by the 4017. With BCD counters, the LS42 BCD-to-decimal decoder serves an equivalent need. These decoders usually have active-low outputs, and can be used directly to drive LED's. In fact, LED bar graph arrays could be used for a display, or the outputs could light cutouts (for example) of each digit. The decodes could also drive relays to activate any kind of display. The possibilities are endless.
Analog watches contain an quartz-crystal controlled oscillator, usually at 32,768 Hz, which is divided down by 215 to a tick that works an electromagnetic ratchet driving the second hand. The second hand of my watch ticks seconds, and drives the hour and minute hands by spur gearing, so the watch is really electromechanical. My references on "How Things Work" are silent on watches and barely mention clocks except in general terms. The electronic wristwatch is a remarkable clock. My inexpensive wristwatch seldom is off by more than a second in several months, by comparison with WWV. Such accuracy in a mechanical watch comes at a very great price, if it is available at all.
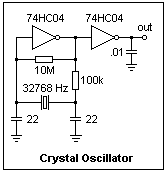 A 32,768 Hz oscillator is shown at the right. All of the components shown are necessary. The crystal, which is a small metal cylinder with fine wire leads, will not drive a Pierce oscillator made with an MPF102. In this oscillator, the 10M resistor biases the inverter to the middle of its linear region (output 2.5 V). Feedback is supplied by the 100k resistor and the crystal. The output of this oscillator is very rough, especially the edges, so the .01 μF capacitor is necessary to clean it up, even when it has passed through a second inverter. It was not possible to pull the oscillator frequency significantly by adding capacitance in parallel with one of the 22 pF capacitors.
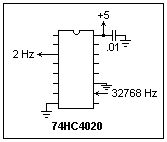 The output of the crystal oscillator can be counted down with a 74HC4020 14-stage binary ripple counter, as shown at the left. The unlabelled pins are all outputs at various stages (not all 14 are present). The .01 μF despiking capacitor should be near the chip and is necessary. Without the capacitors, the crippling sensitivity of CMOS to noise (here, bad edges) is easily seen, a result of the high-impedance inputs. A very good reason for prototyping is seen here. Some CMOS designs that look good on paper will not work reliably in practice. A Schmitt trigger inverter (74HC14) may also help in cases like these. The 2 Hz output can be divided down to minutes by an LS90 and an LS92 (10 x 12 = 120).
 The 74HC4060 not only contains the same 14-stage counter as the HC4020, but also an inverter in the clock line, which can be used as an oscillator. An RC oscillator can be used, as shown in the data sheets for the HC4060, but this is not stable enough for a clock. The diagram at the right shows how to apply a crystal-controlled oscillator to the chip, using a 32,768 Hz watch crystal. The output is a 0.5 s tick, or 2 Hz, in this case. This oscillator seemed to work well in general, but may oscillate at a higher frequency if there is too much noise. This is the oscillator I intend to use when I build a clock.
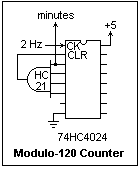 The 2 Hz signal must be divided by 120 to get minutes. The 74HC4024, a 7-stage ripple counter, can be used to this purpose, as shown in the diagram at the left. With a 5 V supply, it will count up to 22 MHz. The active clock edge is the negative one for this counter (and the other 4000 counters, except for the 4017). The trick used is that 64 + 32 + 16 + 8 = 120. All these outputs are detected by the 74HC21 and used to clear the counter after the 119th count. If you cannot find a 74HC21, use a 74HC20 and a 74HC04 inverter instead, or a 74LS21 with a 4.7k pullup resistor. The minutes signal, with a 50% duty cycle, is taken from the QG (64) output, so that it will be stable for one clock period (0.5 s). The clear pulse is so short, 20 ns or so, that it is unusable. Test the counter by putting 120 kHz on the clock, and you should read 1 kHz at QG.
 An alternative is to use 74HC163 synchronous counters, as shown in the diagram at the right. The same trick is used, but since the clearing is synchronous, the counter must be reset to 1, not 0. This is easily done, as shown, so that the counter counts from 1 to 120 instead of from 0 to 119. In this case, the 120 state remains for a clock period, instead of instantly disappearing as for an asynchronous reset. This is N1 to N2 counting, not modulo counting, though it is called a modulo-120 counter in the label. This counter works excellently, and produces a good minutes signal. Counting proceeds while the "halt" input, connected to the CEP pins, is high, stops when it is pulled low. This starts and stops the clock for setting. The counter can be set to "1" if an active-low reset signal is AND'ed with the output of the HC20, using an HC08. This could be the same as the halt signal if halting should also reset the seconds counter.
The power mains frequency, 60 Hz in the US and 50 Hz in England, can be divided down to a 1 Hz tick with great ease (6 x 10 or 5 x 10). This frequency is not precisely stable in the short term, but over longer intervals, of perhaps a day, it is adjusted (by speeding up or slowing down the alternators) so that a clock based on it does not gain or lose time. The time is accurate enough for general public use, however, and the generating authority may specify how closely it agrees with Standard Time. Any crystal oscillator will probably keep better time than the power line over short intervals.
The separators between hours and minutes, or minutes and seconds, which are usually one or two dots, can be made to blink at some comfortable rate, say 1 Hz, to show that the clock is operating. Some Nixie clocks use NE-2 lamps, which are the same color.
Some method must be available to set the clock. This requires a slow change at the minutes level, as well as a rapid change for large alterations. Using up-down counters, the adjustment could be made in both directions, but it is much less trouble to scan only in one direction. 1 Hz is a suitable frequency for the slow change. For the rapid change, 1 kHz would go through 24 hours in 84.6 seconds. Frequencies like this will usually be available.
For the clock I have in mind, setting will proceed as follows. The clock will be halted by disabling the seconds counter, which will also reset the seconds counter to the beginning (1 or 0). The hours and minutes counters can be individually zeroed if desired. A 2 Hz signal can be applied at the inputs of each counter with a pushbutton, instead of the normal counting signal, using 1-of-2 data selectors. The hours and minutes are set at some convenient time in the near future. When that time arrives, the seconds counter is again enabled.
If synchronous counters are used, it would be possible to preload the counters to any value, perhaps selected by thumbwheels, and then to start the clock at the proper moment. This suggests the possibility of synchronizing multiple clocks, or correcting clocks to a standard. Electromechanical means of doing this have been available for very many years. As an example, some clocks are advertised to use WWV signals to correct the clock. This requires some way of receiving the signals and interpreting them in terms of time. Then, if the signal is good (the circuit should be able to determine this by the consistency of readings), this time is jammed into the clock.
When one approaches some project such as this, it is best to study and understand all the details, and not to follow a circuit diagram blindly. It is too easy for errors to creep in at various points, and also what you have available may be slightly different from what the designer used. "Experts" have been known to publish circuits that were never prototyped. All the circuits should be tested on the breadboard and made to work before the final circuit is assembled. Stuffing a PC board is just stuffing a PC board, and only shows you what the components look like. It may be fun, but is not very instructive.
A Nixie Clock
It is not difficult to make a Nixie clock, so if you are interested the project will be enjoyable. I breadboarded a clock on a large solderless breadboard with 4 connection units, 64 rows of 5 and 5 holes, and 7 dual power busses around the periphery and between each connection units. A photograph will be shown here when the film has been developed and scanned. The power busses were wired for +5 V and GND, with 0.01 μF despiking capacitors at the top and bottom of each connection unit. A 10 μF tantalum capacitor, and a 1N4001 diode, were connected at the point of entry of the power. The 1N4001 was oriented to give a short circuit if +5 V were applied to GND, and GND to +5. There was no need for an LED to show when the power was on, since an LED blinks when the oscillator is working.
The MPSA42 transistors to drive the Nixies were put in columns of 5 at the top. The uppermost power bus was devoted to 200 V, not 5 V. One Nixie only needed 3 transistors, another 6, so there are 19 transistors in all. Color-coded wire, for the digits 0-9, was used to make checking easy. The four 4017 counters are in a row, one in each connection unit. An HC08 is below the leftmost counter, for which it serves as reset logic. Below it is the HC00 for debouncing the run/set SPDT switch. Next comes the HC4060 crystal oscillator and counter that makes a 2 Hz signal. An LED blinking half-seconds shows when this signal is active. This LED is buffered by an HC04, used only for this purpose. The 32,768 Hz crystal is a small cylinder (the very small watch crystals are too small to be practical; be sure you get one of the larger ones, about 2.5 mm diameter by 8 mm long). This circuit feeds the seconds counter formed from two HC163 synchronous binary counters and their HC20 reset logic. The minutes signal output from this counter is sent through an HC157 quad one-of-two data selector to the minutes counter when the run/set line is high. The output of the minutes counter is also routed through the data selector to the hours counter. The minutes counter counts from 00 to 59, the hours counter from 00 to 23.
A means of setting the clock accurately is very important. When the run/set line is low, the minutes and hours counters can be independently connected to the 2 Hz signal by a pushbutton, and quickly set to any desired values. At the same time, the seconds counter is reset to 1. The HC08 is used to combine the run/set signal with the usual reset signal. When the run/set switch is moved to set, the counters may increment as their clocks are pulled high, but this is of no consequence at this point. When the switch is again moved to run, the clocks will not experience an active clock edge and will not change unexpectedly. It was necessary to debounce the run/set switch to ensure this. After setting the hours and minutes counters, the run/set switch is returned to run at the exact time displayed. When testing your clock, pay special attention to the roll-overs, from 59 to 00 minutes with the hours incremented, and from 23 59 to 00 00. Find out how much the clock gains or loses in 24 hours, perhaps by comparison with WWV.
After some experience, I believe that it might be more convenient to use a debounced pushbutton rather than the 2 Hz signal for setting the minutes and hours registers. At the cost of making more pushes, the problem of releasing the pushbutton at exactly the correct moment will be eliminated. Also, a switch to disconnect the high voltage when the clock will not be observed (as at night) will extend the life of the Nixies.
The clock cannot be regulated (experiments with pulling the crystal oscillator will be made), although its rate is constant and can be determined by observation, so that the correct time can always be found. Seconds are not displayed for simplicity, since adding a seconds display would be considerable trouble and would contribute nothing new. The moments of change can be accurately observed, however, and the 2 Hz LED counted, if desired. The clock functioned when power was first applied, except that the tens of hours counter had a problem with its reset, skipping "0." This was cured by a .01 μF capacitor in the reset line, a common CMOS expedient. The Nixies are a very pleasing display. If you cannot find any, 10-element bar graph arrays would provide an unusual readout at low cost. Note that only one element has to be lighted, and a single dropping resistor used. However, the signals must be buffered, and cannot be used directly off the 4017's. Alternatively, a lot of NE-2's could be assembled into a neon display.
The clock was tested through a 48-hour period. It agreed precisely with two other digital clocks. Comparing with my watch, the variation was no greater than one second over the test period. The clock is certainly an accurate and practical one, with an attractive display. The neon color is a pure orange, tending more towards yellow than red, and certainly quite visible.
Power Supplies for a Nixie Clock
 The 5 V logic power supply is no problem, of course. The Nixies must be supplied with at least 170 V on the anode, and this is the source of any difficulty. The peak value of 120 VAC is 167 V, so it just misses the required level. A doubler has been suggested, but this gives over 300 V, which is a little high, although it would serve. Using a 240 V supply directly is the same. Any power supply working directly from the mains has grounding problems that are well-known. With care, these are not a significant hazard. The only real problem is the unexpected raising of conducting surfaces to line voltage, instead of ground, but this can be taken care of by using a polarized plug and ensuring that proper connection is made. The experimenter will have no difficulty with this.
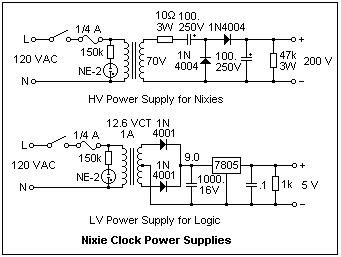
I happened to have a transformer with a 70 V secondary available (it was the highest secondary voltage I could find on the surplus market). Doubled, this will give 200 V. A suitable circuit, with power line isolation, is shown at the left. The output is not well-filtered, but this is not necessary for the Nixie anodes. A 4-Nixie display will draw no more than 8 mA. Also shown is a 5 V supply made from inexpensive parts. It is necessary to keep the voltage supplied to the 7805 regulator above 7.3 V. In this circuit, the regulator sees about 9.0 V, which is close to the recommended value of 10 V and quite adequate. The transformer is easy to find. The 5 V supply should be ample for the clock, especially if HC and CMOS logic are used. The NE-2 and dropping resistor are usually supplied in one package with a red lens. Do not forget the bleeder resistors at the outputs. Some current is necessary to run the 7805, and the high voltage capacitors must be discharged for safety. This power supply works very well.
A 125 V secondary, 15 mA transformer is available from Antique Electronics for $16.95 (P-T442), and a 250 VCT, 100 mA transformer with a 6.3 V, 2A winding for $33.45 (P-T269AX) if you have lots of money. The transformers I used in my circuits were considerably cheaper. 125 VAC has a peak value of 177 V, which should just do, considering diode drops.
Appendix: The JK Flip-Flop
 Some counters are realized with master-slave JK flip-flops, and this appendix explains this circuit. The JK flip-flop does essentially the same thing as a D flip-flop, but is a little more flexible, since it has two inputs, called J and K, instead of only one. The truth table for a JK flip-flop is shown at the right. Most current JK flip-flops are edge-sensitive, like D flip-flops, and respond to the state of the inputs at the time of the clock edge. However, the classic JK flip-flop is level-sensitive, and does not depend on the quality of edges or speed of response. This appendix describes the level-sensitive or master-slave JK flip-flop, realized as the 7473 or the 74107. The LS versions of these chips are edge sensitive. They work the same way externally, but the internal circuit is a little different.
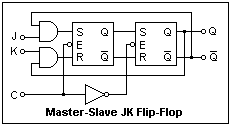 The principle of the master-slave flip-flop is shown at the left. The two blocks are set-reset or SR flip-flops, that respond to the S and R inputs when the enable E is low. When E is high, they cannot change state. A logic high on S causes Q to go high, while a logic high on R causes Q to go low, provided E is low. Both S and R should not simultaneously be high, or the circuit will not enter a predictable state. These two SR flip-flops are enabled so that the left-hand one, or master, responds when E is low, while the right-hand one, or slave, responds when E is high. The output of the slave is fed back to the input of the master, but there is no possibility of a "race" because the two are never simultaneously enabled (the actual circuit makes certain of this; the simple inverter, of course, shown in the diagram would not, because of propagation delay). Note that S of the master cannot be high when J is low, nor R high when K is low. When both J and K are high, the complement of the current state is fed back, so the flip-flop will toggle when E goes high.
The proper way to use a level-sensitive JK flip-flop is to ensure that the inputs are stable before E is brought low. The slaves have stabilized while E has been high, so this will be the case. When E is brought low, the outputs will change, and so perhaps the inputs to the masters. However, the changes will not be acted upon, because the masters are not enabled. Only the final state will be latched into the masters when E is raised again. It seemed that some digital designers could never get this straight, so they demanded edge triggering. Chip designers have been crafty enough that this has proved satisfactory in most cases. Note that level-sensitive flip-flops are immune to glitches, while edge-triggering can be bedeviled by them, so this change is not altogether beneficial.
Return to Electronics Index
Composed by J. B. Calvert
Created 23 June 2002
Last revised 11 July 2002